Get Started with GraphAPI in Power Apps

Integrating the Graph Api into your PowerApps opens unlimited options to your apps.
With the new feature which allows PowerApps to understand and handle JSON responses from the GraphAPI
1. Connect to the Graph Explorer
To start exploring what you can do with the Graph Api, no better tool to use than the Graph Explorer.
Connect to Graph Explorer | Try Microsoft Graph APIs – Microsoft Graph and log in with your tenant login.
Once authenticated, you will be shown a list of Products’ operations (left side panel):
You can select an operation from the left side panel, which will generate the request (Post or Get).
You can simply click “Run Query” to run the request. This will make the call to the Graph Api, and return a response.
Analysing the response allows you to understand what you get from each request.
You need to understand that the the graph Api talks JSON only, and this takes us to the next point: How to interpret this response in your Power Apps ?
2. Connect the Graph API connector to your Power Apps
In your PowerApps Application, navigate to your Data sources.
Search for “Office 365 Groups” and add it to your data sources.
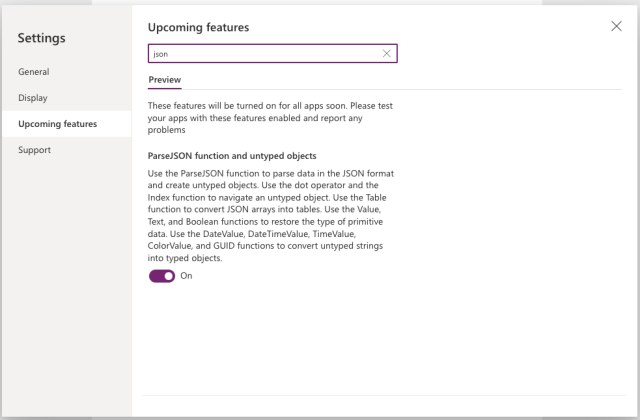
3- Enable the ParseJSON function and Untyped Objects feature in Power Apps
Now, we move to the important feature which will allow our Power Apps to understand and parse the json responses we will be expecting from the Graph Api.
To do so, navigate to your app settings, and select “Upcoming Features“.
Now, search for ParseJson, and enable the feature called “ParseJson function and untyped objects“.
4- Get my profile response from the GraphAPI
Let’s start simple, and assume we want to make an easy request to the GraphApi.
We will be looking at the “my profile” function of the Graph Api.
As you can seen in the screenshot below, the “my profile” function is a get function to the “https://graph.microsoft.com/v1.0/me”
We will set a simple screen, with:
- A button, to make the Graph Api call
- A text box, which will use to display the section of the response we want.
The button OnSelect code looks as follow:
Set(varMyProfile, Office365Groups.HttpRequest("https://graph.microsoft.com/v1.0/me","GET",""))
Now, we have in the varMyProfile variable the response. Please remember, that this is the Json Response, which means we will need to deserialise it before we can use it.
The good thing is that there is nothing required for this deserialisation process, we just need to identify which part of the response we want.
As you can see here, the response gives us things such as: displayName, givenName, jobTitle, mail …etc.
Let’s say we want to display the display name followed by the job title and office location, in this format Name-JobTitle-Location.
The text value of the label is as follow:
varMyProfile.displayName & " - " & varMyProfile.jobTitle &" - " & varMyProfile.officeLocation
Please note:
1- There is an easier connector to get these details, this sample is just to show you the concept of getting the data directly from the Graph Api.
2- It would have been better, if we got intenseness for autocomplete, hoping we will see this feature in the future 🙂


